

How to Restore Brushed Finish on Your Watch
Restoring a brushed finish on a watch means using controlled, fine abrasion to reintroduce the original grain texture without removing material or rounding the case edges. The industry term for this process is satin finishing, and it requires a fine-grit abrasive pad, painter’s tape, and a steady hand. The 2026 standard method uses a brand-new green Scotch-Brite pad with light, linear pressure to match the factory grain. Done correctly, this process revives a luxury watch’s original look and protects its resale value. Done incorrectly, it permanently alters the geometry that makes a fine timepiece worth what you paid for it.
What tools do you need to restore a brushed finish watch?
Preparation determines whether your restoration succeeds or creates new damage. The right tools are not expensive, but each one serves a specific purpose you cannot skip.
| Tool | Purpose | Selection tip |
|---|---|---|
| Fine-grit green Scotch-Brite pad | Abrades surface to restore grain | Always use a brand-new pad for consistent results |
| Painter’s tape | Protects polished surfaces and edges | Use low-tack tape to avoid adhesive residue |
| Microfiber cloth | Removes debris between passes | Use a lint-free cloth rated for optics |
| Mild dish soap and warm water | Pre-cleans the case before abrasion | Avoid harsh degreasers that strip protective coatings |
| Magnifying loupe or glass | Lets you evaluate grain direction and depth | 5x magnification is sufficient for most cases |
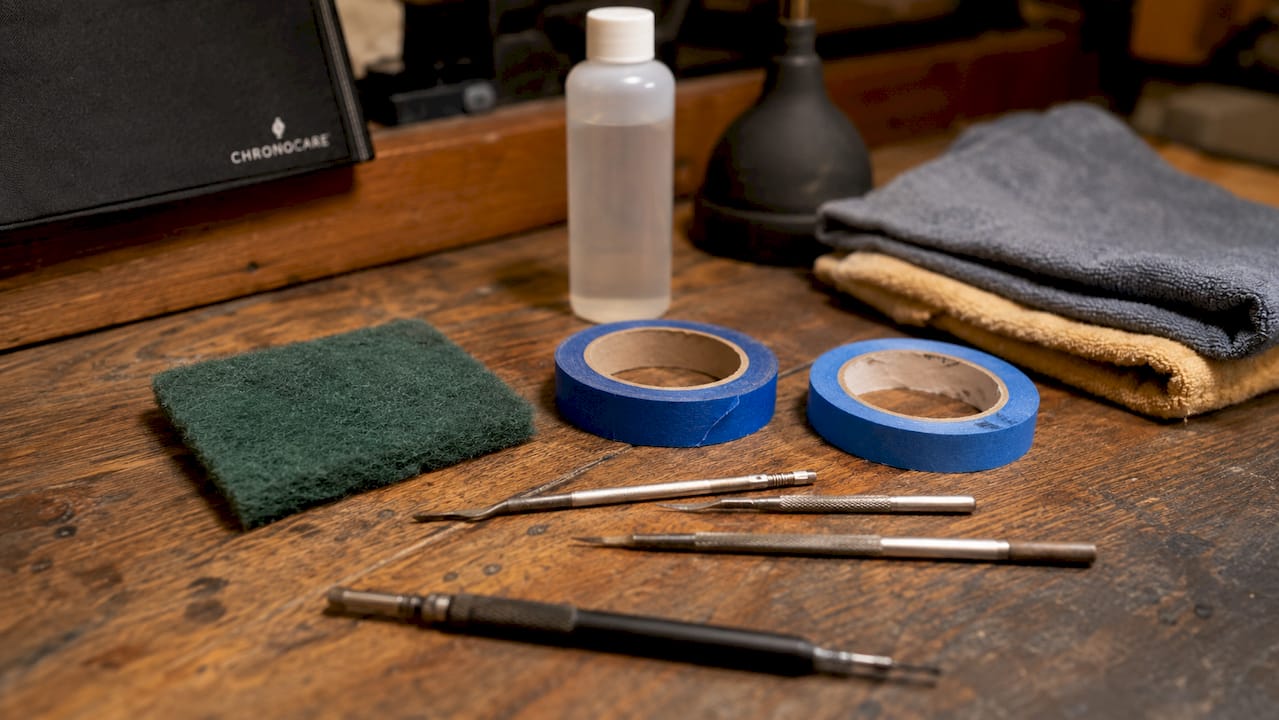
Masking polished surfaces with painter’s tape before you begin is non-negotiable. Accidental abrasion on a polished bezel or case side permanently damages the contrasting finish that defines most luxury watch designs. Brands like Rolex, Omega, and Grand Seiko rely on that contrast for their signature aesthetic.
Cleaning comes before any abrasion. Accumulated oils and grime often conceal the original finish, making it appear more damaged than it actually is. A 5–10 minute soak in warm, mild soapy water frequently reveals an intact factory finish underneath what looked like deep scratches.
Pro Tip: Soak the watch case in warm soapy water for 5–10 minutes and dry it completely before you assess the damage. You may find the finish needs far less work than you thought.
How to restore a brushed watch finish step by step
The technique here is everything. Random or back-and-forth strokes will destroy the grain pattern. Consistent linear strokes in one direction are the only way to replicate the original satin texture.
-
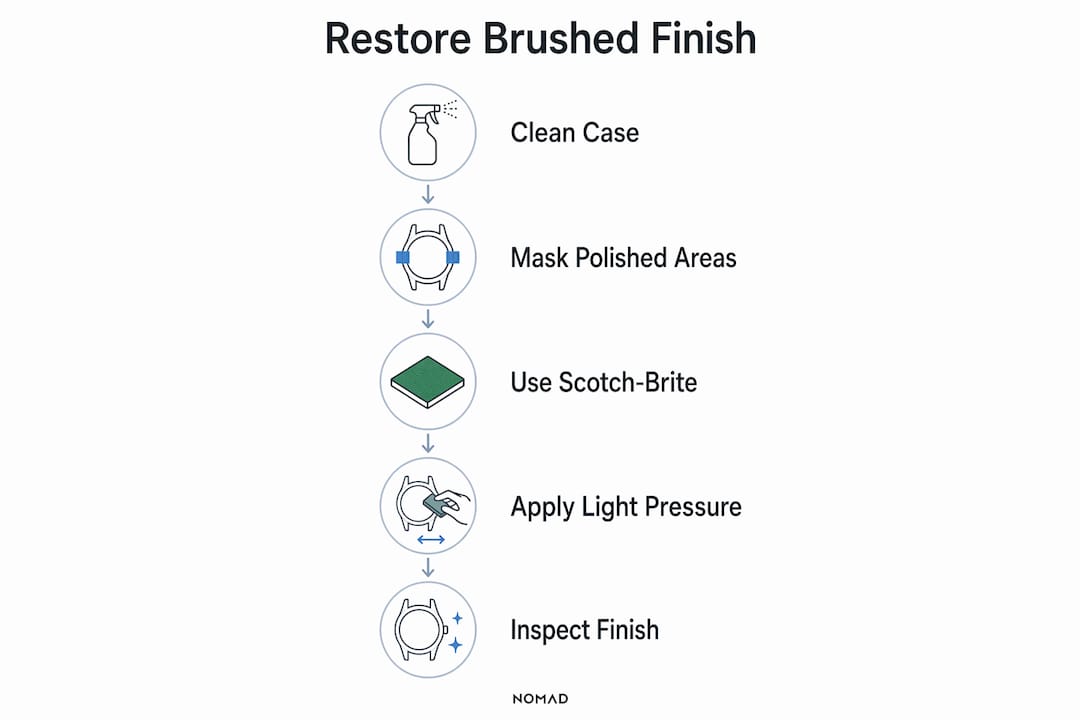
Clean and dry the case completely. Remove the strap or bracelet if possible. Wash the case with mild soap and warm water, then dry it with a microfiber cloth. Any remaining moisture or grit will cause uneven abrasion.
-
Identify the grain direction. Examine the brushed surface under good light or a loupe. The original grain runs in one consistent direction. You must match this direction exactly with every stroke.
-
Mask all polished surfaces. Apply painter’s tape to any polished facets, the bezel, and any chamfered edges adjacent to the brushed area. Press the tape edges firmly to prevent abrasive particles from slipping underneath.
-
Start with the finest abrasive available. A fine-grit green Scotch-Brite pad is the correct starting point for most light scratches. Using too coarse a pad removes too much material and creates inconsistency that is harder to correct than the original scratch.
-
Apply light, even pressure in one direction. Use the pad flat against the surface. Pull it in one linear stroke following the grain direction. Lift the pad, return to the start, and repeat. Never drag it back across the surface.
-
Evaluate after every 3–5 strokes. Wipe the surface clean with a microfiber cloth and examine it under light. You are looking for the grain to become uniform. Stop the moment the scratch disappears into the surrounding texture.
-
Increase abrasion only if needed. If light passes are not removing a deep scratch, move to a slightly coarser pad. Work back to the fine pad afterward to refine the surface. This graduated approach protects the case geometry.
-
Remove tape and do a final inspection. Check the borders between brushed and polished areas. Any abrasion that crossed the tape line requires professional correction.
Pro Tip: Start with the absolute lightest pressure you think is necessary, then reduce it by half. You can always add more passes. You cannot undo material removal.
For a deeper look at dry polishing techniques that preserve case value, ChronoCare’s guide covers the nuances of working with multifaceted cases.
Common mistakes that damage brushed finishes
Most at-home restoration errors are not caused by the wrong tools. They are caused by impatience and skipping the cleaning step.
- Skipping the pre-clean. Grime and skin oils make a finish look worse than it is. Many collectors have abraded a perfectly intact surface because they did not clean it first.
- Using polishing cloths or shine-enhancing products. Polishing cloths designed for high shine create uneven shiny patches on brushed surfaces and permanently alter the matte grain. Products like Selvyt cloths or Simichrome polish are for mirror finishes only.
- Rubbing in circular or back-and-forth motions. This is the single most common error. It creates a swirled, inconsistent texture that looks worse than the original scratch and is extremely difficult to correct.
- Over-brushing past the damaged area. Abrading a larger area than necessary creates visible tonal differences between the restored section and the surrounding original finish.
- Ignoring sharp edges and chamfers. The crisp edges on a Rolex Submariner or an Audemars Piguet Royal Oak are machined to precise angles. Even one extra stroke across an edge rounds it permanently and reduces the watch’s value.
If you have already made one of these errors, stop immediately. Continuing will compound the damage. A minor inconsistency is correctable by a professional. A fully rounded case edge is not.
Recovery from minor over-brushing is possible if you catch it early. A professional with a satin finishing machine can re-establish grain consistency across the entire surface. For guidance on when professional cleaning becomes necessary, ChronoCare’s checklist covers the key indicators.
At-home restoration vs. professional finishing: which is right for you?
Not every watch is a good candidate for at-home refinishing. The material, geometry, and value of the piece all determine which approach is appropriate.
| Factor | At-home restoration | Professional finishing |
|---|---|---|
| Scratch severity | Light surface scratches only | Deep scratches, gouges, or finish loss |
| Case material | Stainless steel | Titanium, tungsten, platinum, ceramic |
| Case geometry | Simple flat brushed surfaces | Multifaceted cases, chamfers, complex lugs |
| Risk level | Moderate with proper technique | Low, controlled with specialized equipment |
| Cost | Low (under $20 in materials) | Higher, but preserves value and geometry |
| Recommended for | Everyday steel sport watches | Dress watches, limited editions, high-value pieces |
Professional tools like satin finishing machines and ultrasonic cleaners achieve matched factory finishes without the geometry loss that manual abrasion risks. These machines control pressure and heat precisely. Excessive heat or pressure during polishing causes permanent loss of design fidelity on multifaceted cases, which is why professional work is the only safe option for complex pieces.
Professional maintenance every 12–18 months is the recommended interval for luxury watches with complex designs or hard materials. This schedule keeps the finish consistent and catches movement issues before they become expensive repairs. The ChronoCare luxury timepiece maintenance checklist maps out exactly what to inspect at each interval.
Watches made from tungsten, platinum, or ceramic require specialized abrasives and equipment that are not available in consumer kits. Attempting to refinish these materials at home almost always results in uneven texture or surface cracking. For these pieces, professional servicing is the only responsible choice.
Key takeaways
Restoring a brushed watch finish requires cleaning the case first, masking polished surfaces, and using fine-grit abrasive pads with consistent linear strokes to match the original factory grain.
| Point | Details |
|---|---|
| Clean before abrading | A 5–10 minute soak in soapy water often reveals an intact finish and prevents unnecessary abrasion. |
| Mask polished surfaces | Painter’s tape protects contrasting finishes and prevents irreversible damage to adjacent areas. |
| Use linear strokes only | Consistent one-direction strokes with a fine Scotch-Brite pad are the only way to replicate factory grain. |
| Know when to stop | Over-brushing rounds edges and creates tonal inconsistency that is harder to fix than the original scratch. |
| Professional service matters | Complex materials and multifaceted cases require professional tools every 12–18 months to maintain value. |
The patience problem: what I’ve learned from years of watch refinishing
The most common mistake I see is not a technique error. It is rushing. Collectors pick up a Scotch-Brite pad, make ten aggressive strokes, and then wonder why the surface looks worse than when they started. The brushed finish on a Grand Seiko or a Patek Philippe Aquanaut is not just texture. It is geometry. Every stroke you take removes material you cannot put back.
My honest recommendation is this: if the watch cost more than $1,000, clean it thoroughly first and look again before you touch it with an abrasive. I have seen dozens of cases where a proper cleaning revealed a finish that needed no restoration at all. The “damage” was a film of skin oils and dried soap.
For watches you do decide to refinish at home, the light touch is not a suggestion. It is the entire method. I use about 20% of the pressure I think I need and evaluate after every three strokes. That discipline is what separates a result that looks factory-correct from one that looks like it was worked on at home.
Combine home maintenance with professional servicing on a regular schedule. Home care handles the day-to-day surface upkeep. Professional servicing handles the geometry, the movement, and the finish consistency that requires machine control. Neither replaces the other. The collectors I know who maintain the highest resale values on their pieces do both, consistently.
— Raymond Jenkins
Keep your watch looking its best with ChronoCare
The right products make the difference between a restoration that looks factory-correct and one that creates new problems. ChronoCare’s Ultimate Watch Cleaning Kit gives you the cleaning foundation every restoration starts with, including the tools to remove oils and grime before you touch an abrasive pad. For collectors ready to go further, the Ultimate Watch Polishing & Cleaning Kit includes refined abrasive pads suited for brushed and matte finishes, formulated specifically for luxury timepieces. Both kits are designed in the US and built around the same principles this guide covers: clean first, abrade carefully, and protect what makes your watch worth owning.
FAQ
What is the best pad to restore a brushed watch finish?
A brand-new fine-grit green Scotch-Brite pad is the industry-standard tool for restoring brushed finishes at home. Always use a fresh pad to maintain consistent grain and avoid transferring debris from previous use.
Can I restore a matte watch finish without professional help?
Light surface scratches on stainless steel cases are suitable for at-home restoration using fine abrasive pads and linear strokes. Deeper damage, complex case geometry, or hard materials like tungsten or ceramic require professional finishing equipment.
How do I avoid damaging polished surfaces when refinishing a brushed area?
Apply painter’s tape firmly over all polished surfaces and chamfered edges before starting. Failure to mask these areas risks accidental abrasion that permanently alters the contrasting finish.
How often should I have a luxury watch professionally refinished?
Professional maintenance every 12–18 months is recommended for luxury watches with complex designs or hard materials. This interval maintains finish consistency and protects the case geometry that affects resale value.
Why does my brushed finish look uneven after restoration?
Uneven texture after restoration is almost always caused by inconsistent stroke direction or pressure. Circular or back-and-forth motions create a swirled pattern that requires professional correction to resolve.